
Required equipment
- USB Wi-Fi adapter.
What is it?
This is a small device that plugs into a USB port on the computer and creates a second Wi-Fi connection. Use it to connect to the GoPro. We recommend choosing an adapter with an antenna and support for both 5 GHz and 2.4 GHz.
- GoPro HERO7 Black through HERO14 Black, except for HERO9 Black, which is not supported.
- A fast, reliable MicroSD card. 128–256 GB is enough for normal work. Be careful with counterfeit cards.
- A mobile phone with the GoPro Quik app installed. It is used to activate the Wi-Fi module on GoPro HERO8-HERO14 Black cameras. It is not required for GoPro HERO7 Black.
- A laptop with Windows 10 or 11. An NVIDIA GeForce graphics card with NVENC support is not required, but it will process videos much faster than even a very powerful CPU.
- A video spinner. Any spinner will work. An Instalab video spinner is started automatically by the software. Other video spinners should be started with the remote control.
Software installation
- Open the email you received. Click the Download software button.
- Download the archive, open it, and run the installer file Instalab360.exe.
- Select the installation language. On the next step, enter the login and password from the email.
- After installation, the following apps will start automatically:
- the Instalab 360 app — you will see two warnings, just click OK;
- the GoodSync app — for uploading your videos to the cloud gallery on instalab360.com/en.
Watch the video for further setup and everyday work with Instalab 360
Connecting the GoPro camera
- Plug the USB Wi-Fi adapter into the computer.
- Install GoPro Quik on your phone from the App Store or Google Play.
- Connect to the camera through GoPro Quik.
How to do it
- Swipe down on the camera touchscreen, then swipe left.
- Tap Preferences / Parameters — the gear icon.
- Select Wireless Connections.
- Open Connect Device.
- Select GoPro Quik.
- In GoPro Quik, rename the camera to
instalab360. Important: use lowercase letters. - In GoPro Quik, tap preview so the camera image appears on your phone screen.
Why this matters
This activates the Wi-Fi module inside the camera.
- Do not turn the camera off. Close GoPro Quik on your phone. Turn off Wi-Fi and Bluetooth on the phone.
- On the computer, click the Wi-Fi icon in the lower-right corner of the screen. If the Wi-Fi adapter is working, you should see two wireless connections. Choose the second one.
- Find your camera’s Wi-Fi network. If you renamed it in step 4, it should be called
instalab360. Connect to the Wi-Fi network with this name. You can find the password in the camera settings.Camera settings
To find the Wi-Fi password on your action camera, turn it on, swipe down on the screen, and open Preferences / Settings. Then go to Connections and Camera Info.
- If the camera connection is established, you will see “No internet connection” under the network name. This is normal: you use another Wi-Fi network for internet access.
- Open the Instalab360 program. The “No connection to GoPro” warning should disappear.
If this does not happen
Click the gear icon in the upper-right corner and enter the camera name. It must match the Wi-Fi network name. By default, the program uses
instalab360.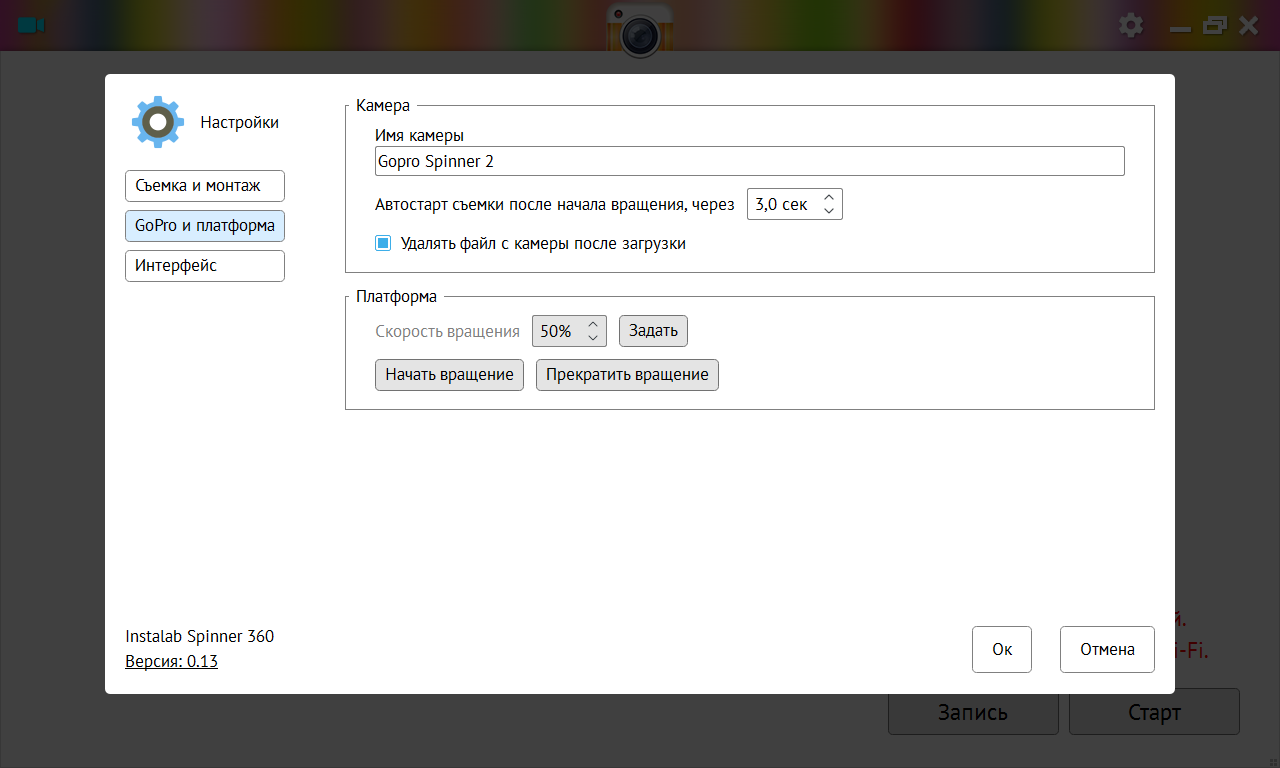
Screenshot 1 After clicking OK, the “No connection to GoPro” message should disappear.
- Set the GoPro video mode to 1080p, 120 fps.
How to do it
- Swipe down from the main screen, open Controls, and choose Pro.
- Swipe left or right to select video mode.
- Tap the video settings at the bottom of the screen. Select Resolution/FPS and set 1080|120. If 120 fps is not available but 100 fps is, change the camera anti-flicker frequency from 50 Hz to 60 Hz in the Anti-Flicker menu.
If the GoPro often disconnects from the computer:
- The camera may be overheating. Remove the battery and connect it to a Powerbank with a good cable. With external power, the camera heats up less.
- 5 GHz usually holds the signal better than 2.4 GHz, but sometimes the opposite is true. You can change this in the camera settings.
- Format the camera memory card.
- Sometimes the problem is caused by poor contact in the power cable: the camera keeps working, but the Wi-Fi connection drops every time. To check this, try working without the Powerbank, using only the battery. If the connection stops dropping, the cable is the problem.
- If the previous steps do not help, right-click the GoPro connection on the computer and choose Forget. Reset the camera to factory settings. Connect it to GoPro Quik again, then connect it to the computer using this instruction.
Video: How to connect to GoPro HERO6–7 Black
Instalab 360 booth control
Video: Preparing the Instalab 360 video spinner for work
- Connect the platform to power.
- Connect the platform to the computer with a USB cable. You can also use the included Bluetooth transmitter, but Bluetooth is less reliable.
- Install the platform driver: download the platform driver.
- Restart the program. The message "No platform connection" should disappear. Open the settings and run a test rotation.
“Recording and editing” settings menu
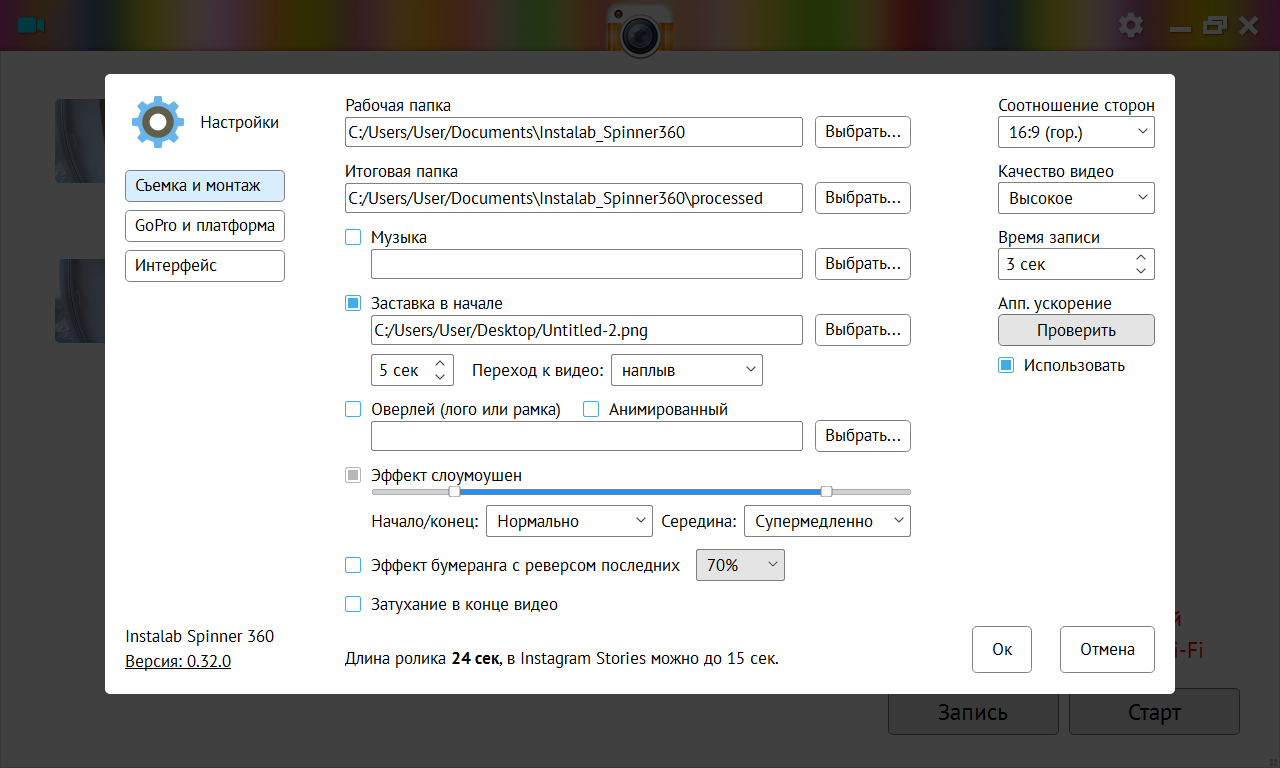
- Working folder (
C:/Instalab360): this is where video clips are processed. The folder must be writable. Do not change this directory unless you really need to. - Folder for finished videos (
C:/Instalab360/processed): this folder is already set in GoodSync for cloud synchronization. Do not change it unless you really need to. - Music. Any MP3 file will work.
- Intro image. You can use any image. Its proportions must match the video aspect ratio selected in the upper-right corner. Recommended sizes: 1920x1080, 1080x1080, or 1080x1920 pixels depending on the format: horizontal, square, or vertical.
- Fade-out — a darkening effect at the end of the video clip.
- Overlay logo. To add a static logo or frame, save it as a PNG file with a transparent background. The image size must match the video size: 1920x1080, 1080x1080, or 1080x1920.
Animated logo. Logo animation is created in Adobe After Effects. Watch the video tutorial. - Slow motion effect. Set the number of slow-motion sections and the speed of the white and blue segments. Alternate fast and slow sections for maximum dynamics. Keep slow sections short so the final video does not become too long.
- Boomerang effect. Replays part of the video clip in reverse. Set the percentage of the video you want to reverse. We recommend no more than 50%.
- Aspect ratio — horizontal, square, or vertical videos. To record vertical videos, use a rotating camera bracket and mount the camera vertically.
- Video quality: low, medium, or high. At high quality, a 30-second clip will be about 50 MB.
- Recording time. This is how long the GoPro will record. Usually 5–7 seconds at 120 fps is enough.
- Hardware acceleration: an NVIDIA graphics card with NVENC support significantly speeds up processing. See the list of supported graphics cards.
Video recording and program interface
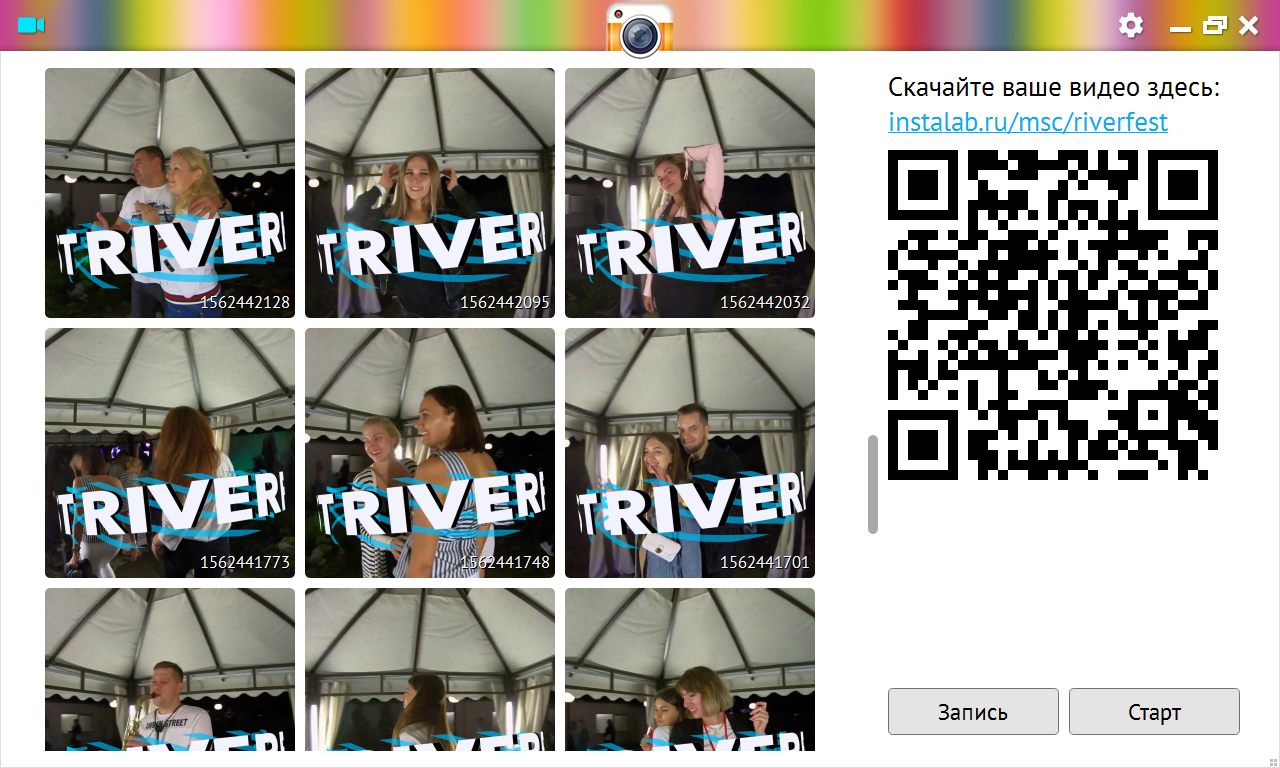
The Start button starts the Instalab platform rotation. If you use a different platform, the Start button will be inactive — start the platform with its remote control.
Click Record: the GoPro will shoot, and the program will download and process the video. In the settings, you can enable automatic deletion of recorded videos from the camera memory card so it does not fill up.
You can start recording the next clip before the previous one finishes processing.
The program interface is intuitive. Main points:
- The QR code on the right lets guests open the gallery with videos. The gallery link is set in the settings. How to create a gallery is described below.
- Right-click a video to open its file location.
- The program has a hot folder (
C:/Instalab360/input) for processing videos recorded earlier. It is convenient for creating test videos for a client. Just place the video you want to process into this folder, and it will be processed with the selected settings. - To delete a video, move the cursor over it: a cross will appear in the upper-right corner.
- The interface language can be switched to English in the settings.
- Hotkeys
show
- Space starts and stops rotation, the same as the Start button.
- PageUp and PageDown do the same. You can use any presentation clicker as a remote control.
Sending final videos to guests
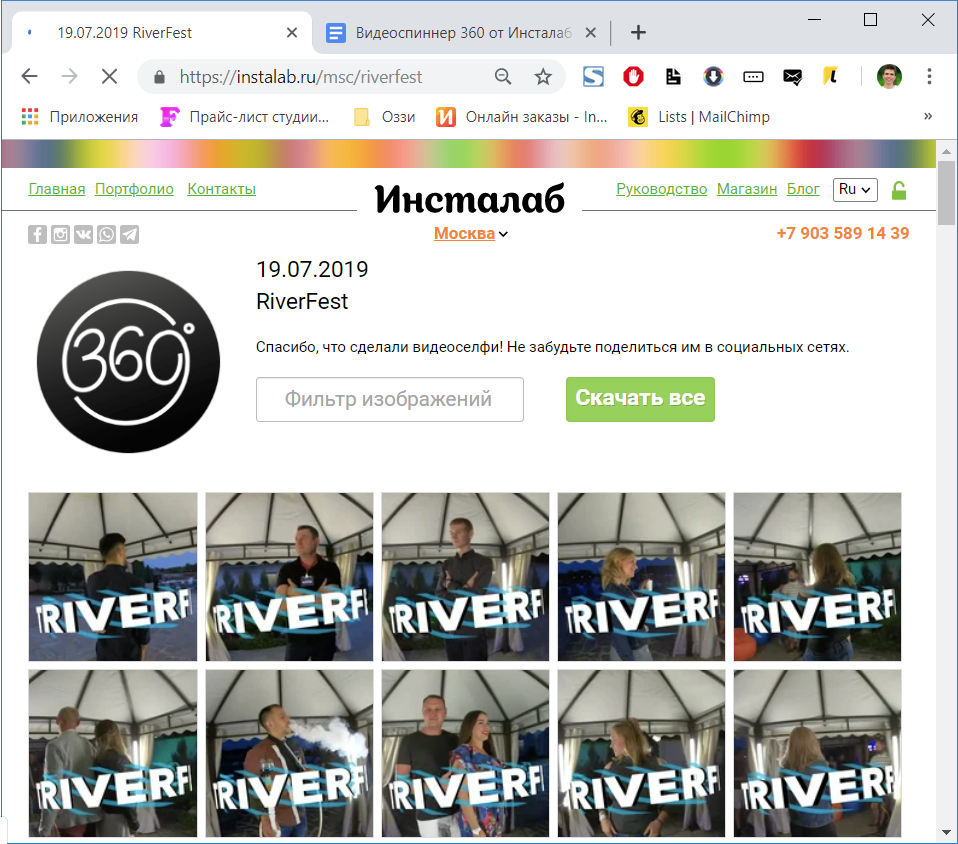
To publish videos in the cloud, create a gallery in your personal account:
- Open your personal account.
- Create a gallery. You can customize it: choose or upload a cover, upload a logo, fill in text fields, and choose the font color.
- Copy the gallery link and paste it into Instalab 360 settings → Interface tab → Gallery link.
You can open the gallery on a large touchscreen or tablet to make the event more interactive. Only a browser is required.
You can send a friend or client a link to a specific video.
Videos in the gallery can be browsed with arrow keys.
Create a new gallery for every new event, or empty an existing one and reuse it.
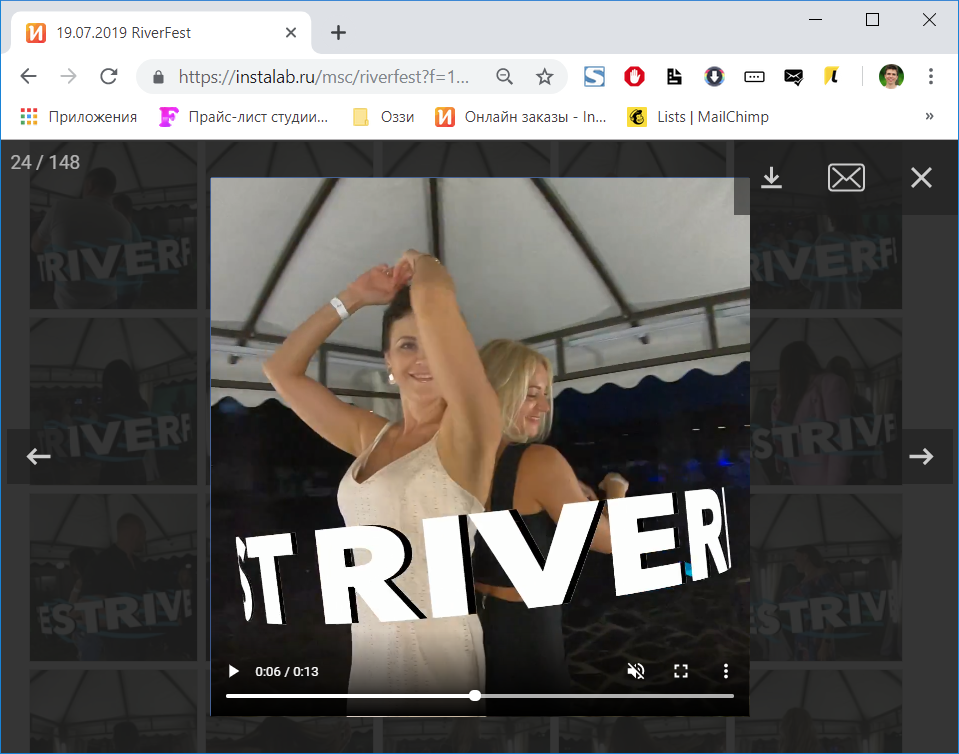
GoodSync and cloud gallery setup
If you installed the software using the installer, GoodSync is already installed and configured. You only need to click the folder on the right and choose the gallery you created in your personal account.
Manual GoodSync installation and setup
- Download GoodSync.
- Run GoodSync Enterprise 10.10.19.5.exe and install the program.
- Restart the computer.
- Start GoodSync.
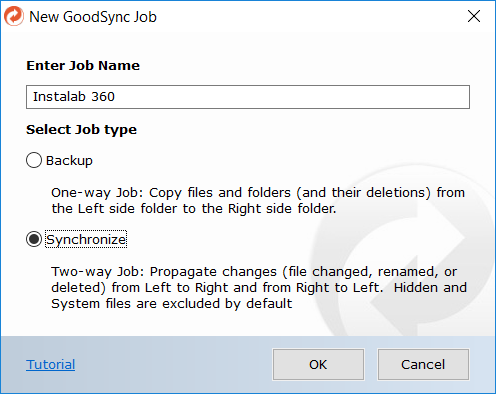
- Enter the project name and choose the Synchronize option.
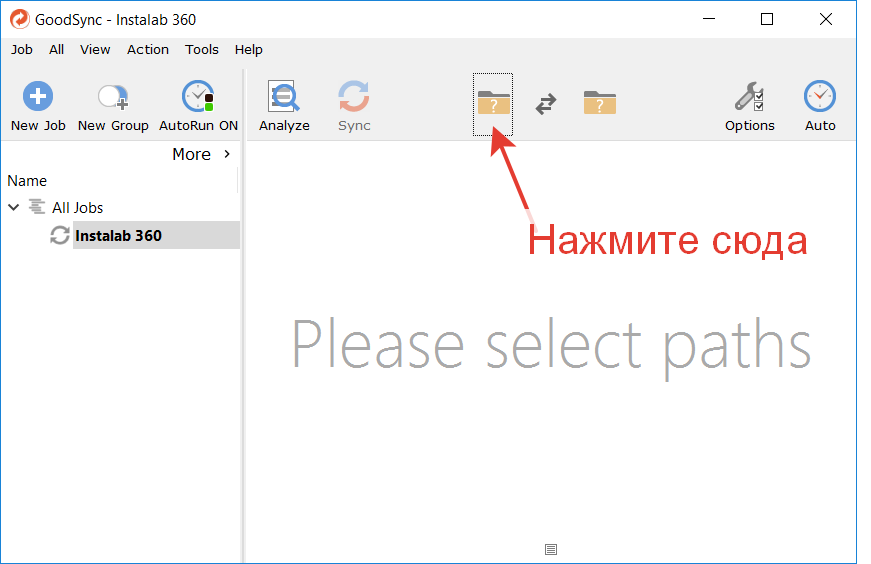
Screenshot 6 - Proceed to selecting the left folder on the server.
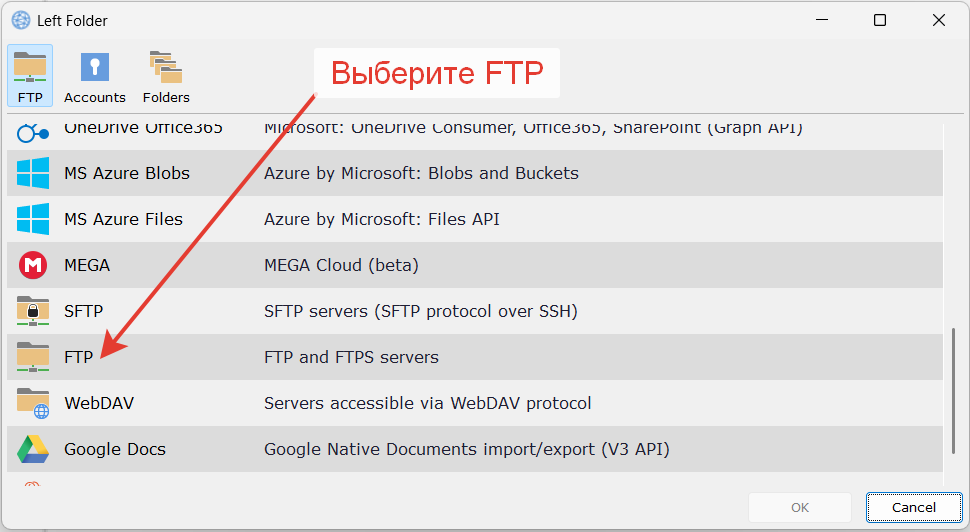
Screenshot 7 - Select FTP.
Screenshot 8 - In the window that appears, fill in the fields as shown in the screenshot:
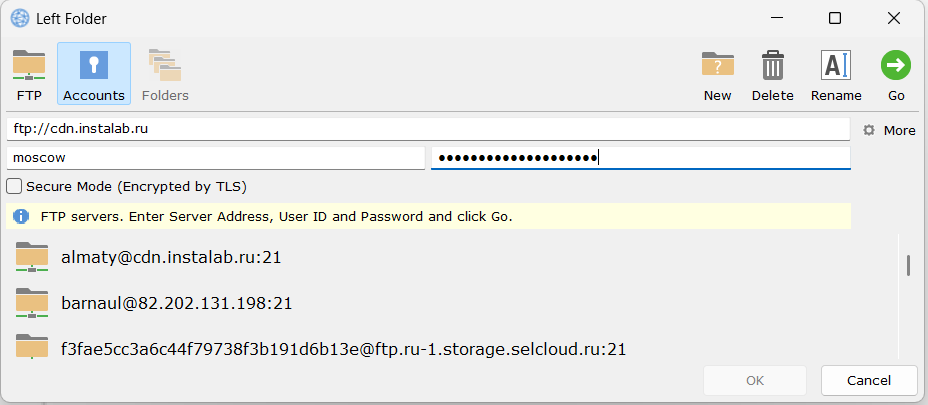
Screenshot 9 - Server: ftp://cdn.instalab.ru
- Then enter your Instalab login, in this example moscow.
- In the password field, enter your password.
Click GO.
- If everything is done correctly, this window will appear:
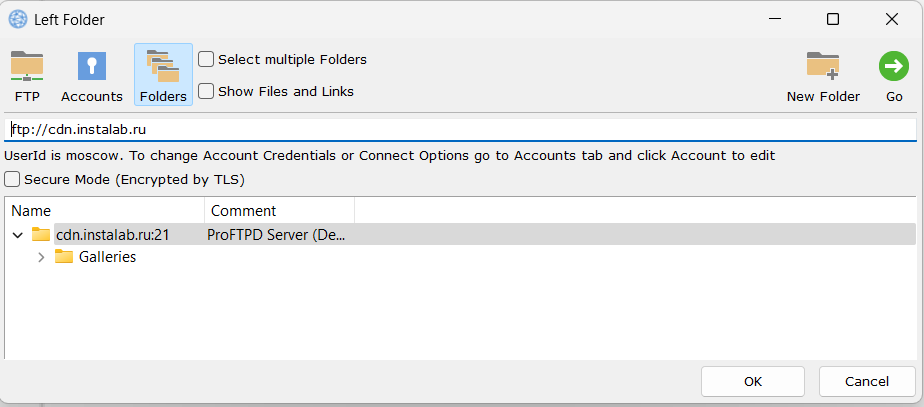
Screenshot 10 - Expand the Galleries folder and select the gallery you will synchronize.
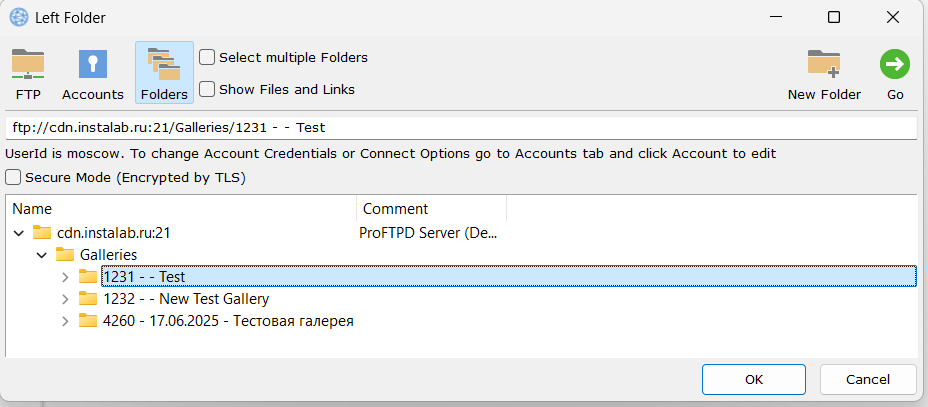
Screenshot 11 Click OK.
- Choose the right folder, which is the folder on your computer. Files will be uploaded from it:
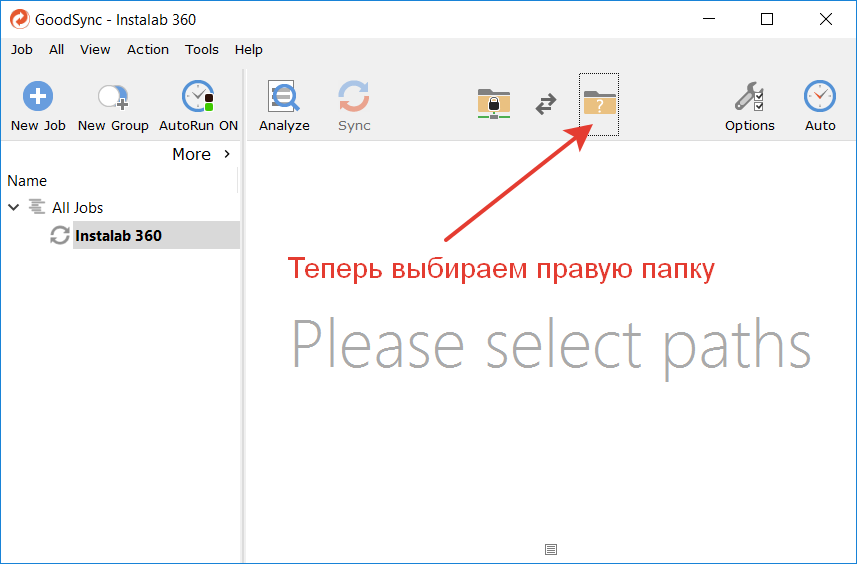
Screenshot 12 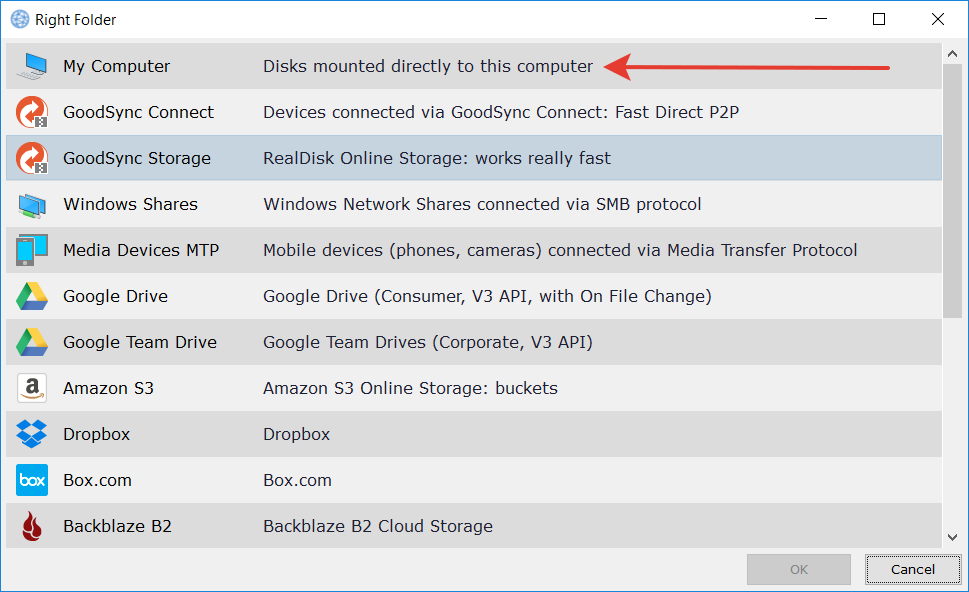
Screenshot 13 - By default, the program saves processed files to
C:/Instalab360/processed: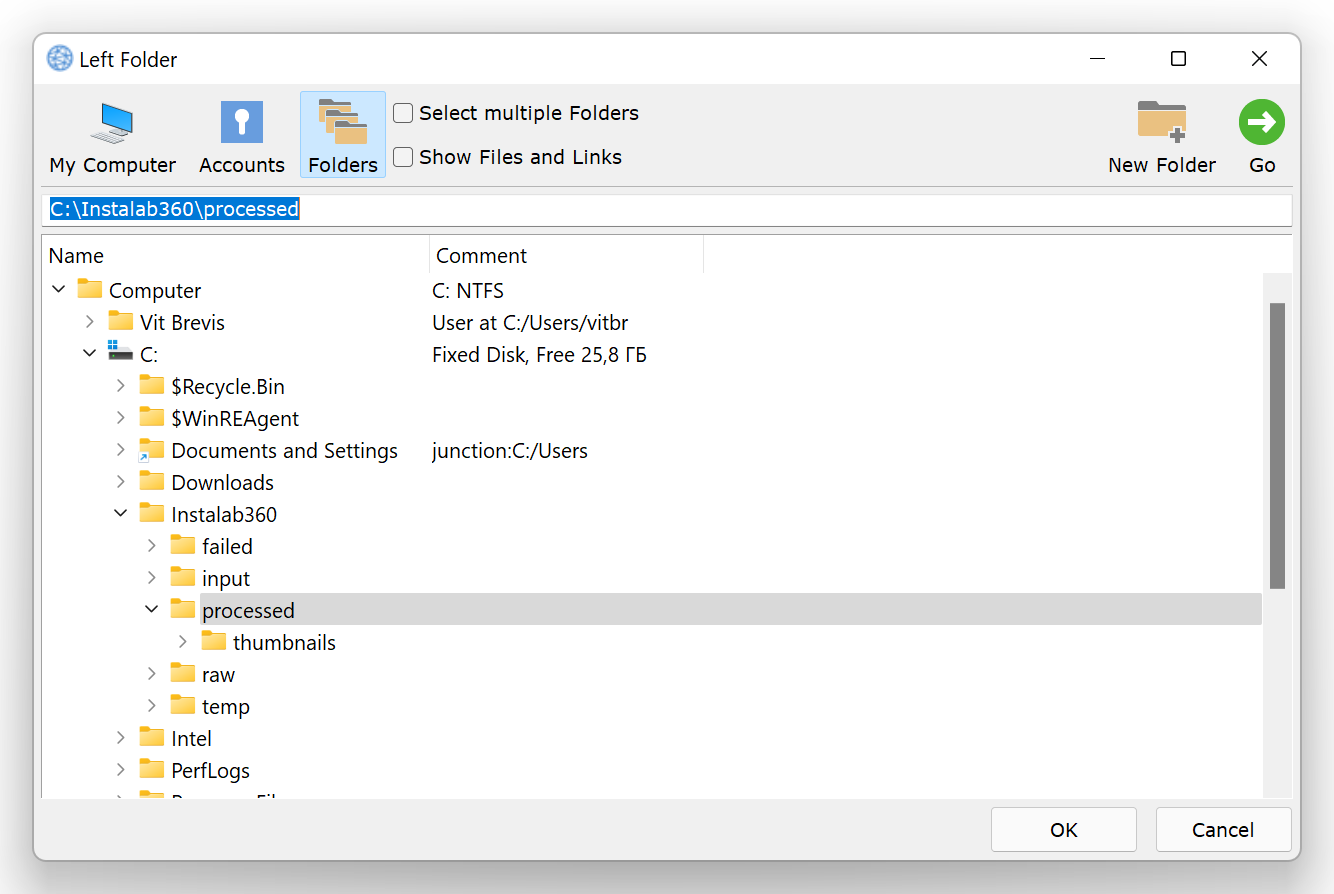
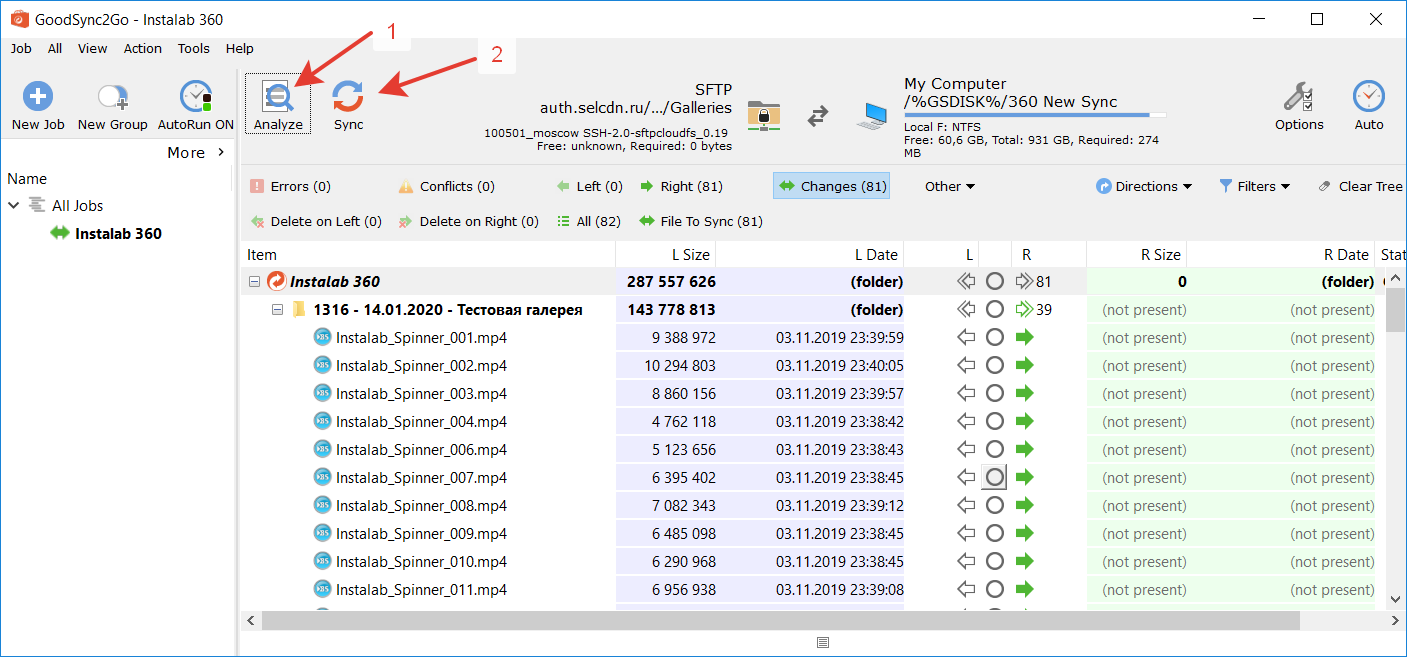
Screenshot 14 - Click Analyze, then Sync. Our galleries will be downloaded from the server to your local directory:
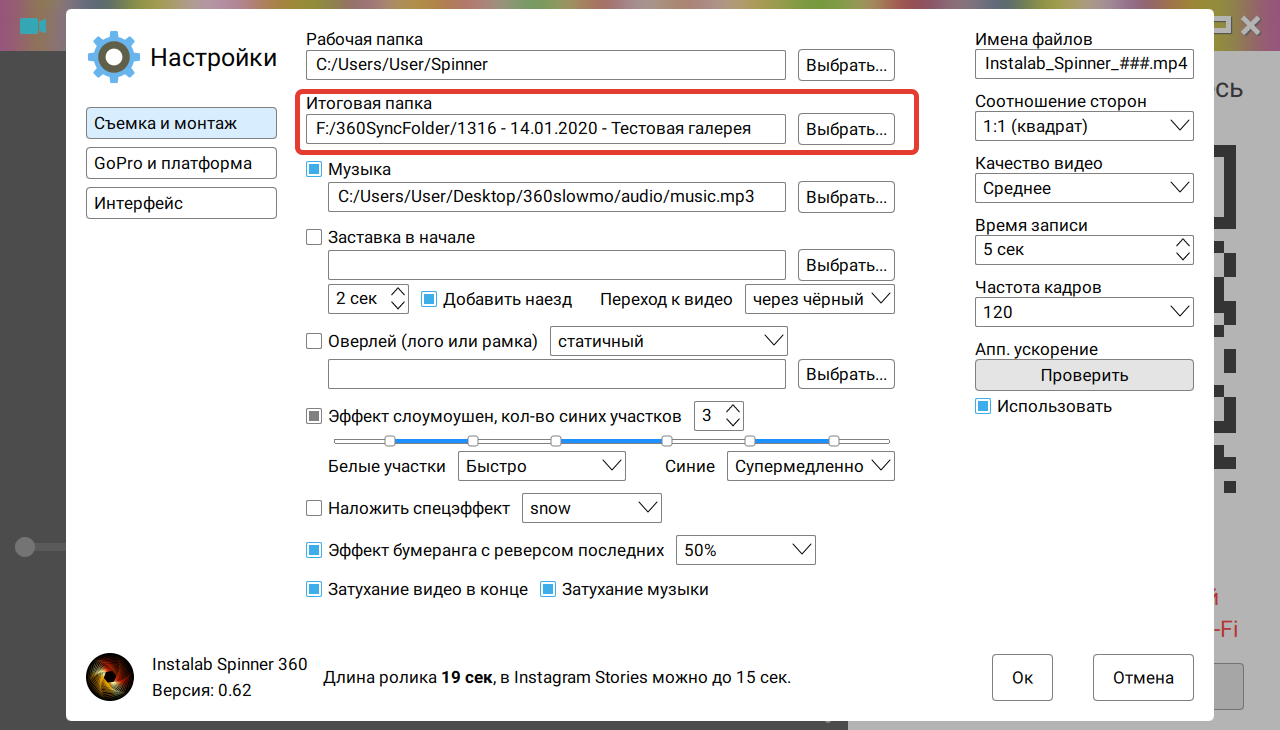
Screenshot 15 - Before each project, you can create a new gallery and a new folder on the computer. For example, you can create a folder named "1316 — 14.01.2020 — Test gallery" and select it in the program as the output folder. In this case, select the same folder in GoodSync for synchronization.
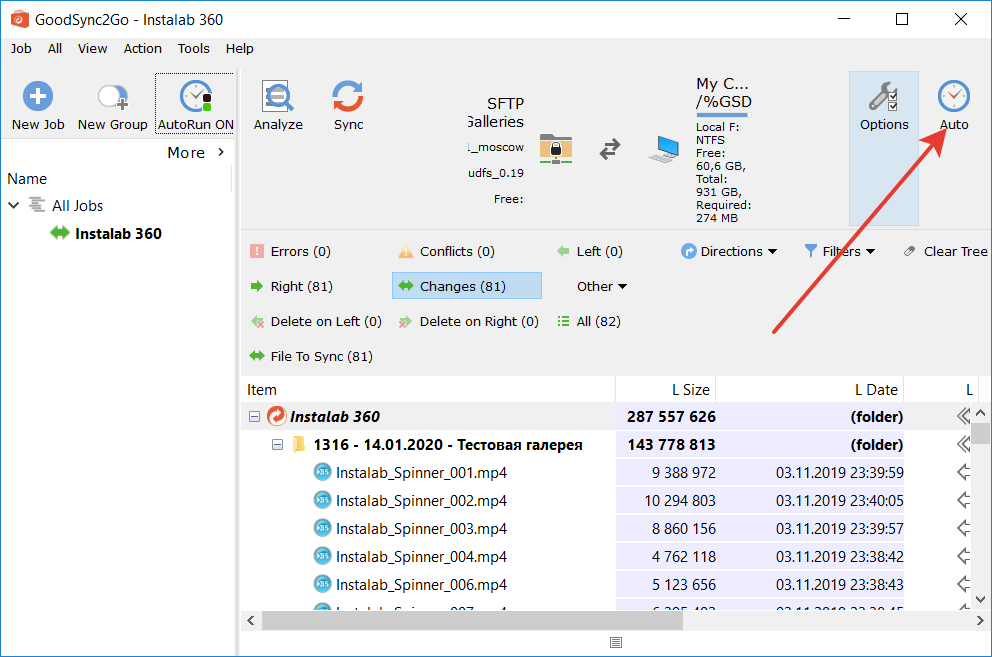
Screenshot 16 - In GoodSync, you can set a timer for automatic checking of folder changes. In this case, new files will be uploaded to the server automatically.
Screenshot 17 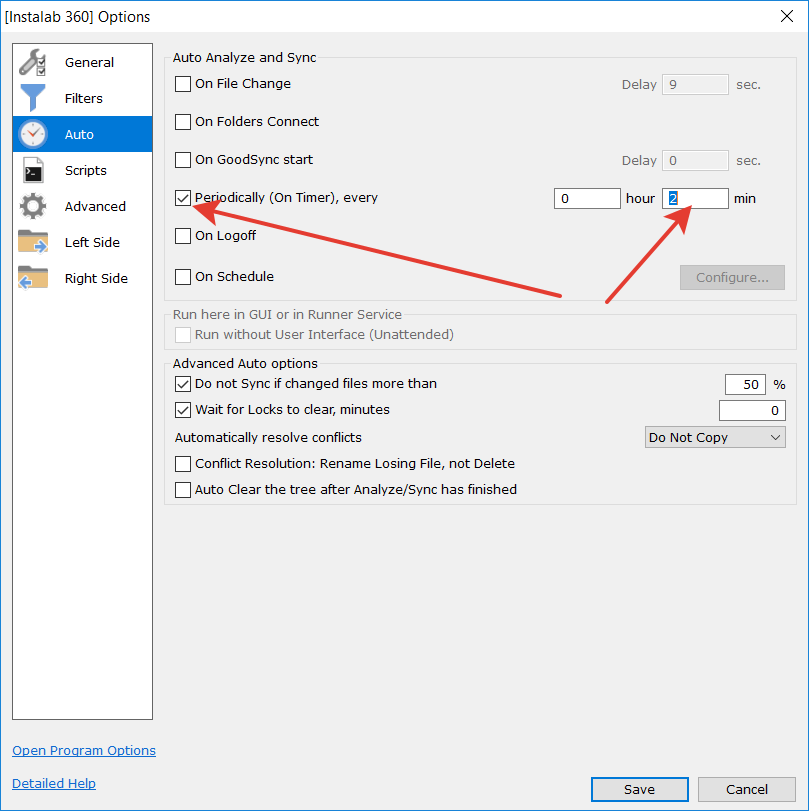
Screenshot 18
If you do not do this, you will need to click Analyze and Sync from time to time to upload new videos. If the internet is slow, disable timed upload to the server. In that case, it is better to click Analyze and Sync manually.
Hardware acceleration NVIDIA
Popular graphics cards that support NVENC hardware acceleration. With these graphics cards, video processing takes about 15–20 seconds.
Expand list
Most popular: GeForce 1050, 1650, 2060, 3060
Gaming: GeForce GTX 1050, GeForce GTX 1050 Ti, GeForce GTX 1060, GeForce GTX 1070, GeForce GTX 1070 Ti, GeForce GTX 1080, GeForce GTX 1080 Ti, Nvidia Titan X and Titan Xp.
GeForce GTX 645, GeForce GTX 650, GeForce GTX 650 Ti, GeForce GTX 650 Ti Boost, GeForce GTX 660, GeForce GTX 660 Ti, GeForce GTX 670, GeForce GTX 680, GeForce GTX 690, GeForce GT 710, GeForce GT 720, GeForce GT 730, GeForce GT 740, GeForce GTX 760, GeForce GTX 760 Ti, GeForce GTX 770, GeForce GTX 780, GeForce GTX 780 Ti, GeForce GTX Titan, GeForce Titan Black, GeForce GTX Titan Z, GeForce GT 640M LE*, GeForce GT 640M, GeForce GT 645M, GeForce GT 650M, GeForce GTX 660M, GeForce GTX 670MX, GeForce GTX 675MX, GeForce GTX 680M, GeForce GTX 680MX, GeForce GT 730M, GeForce GT 735M, GeForce GT 740M, GeForce GT 745M, GeForce GT 750M, GeForce GT 755M, GeForce GTX 760M, GeForce GTX 765M, GeForce GTX 770M, GeForce GTX 780M, GeForce 825M*, GeForce GTX 860M, GeForce GTX 870M, GeForce GTX 880M.
GeForce GTX 745, GeForce GTX 750, GeForce GTX 750 Ti, GeForce GT 945A*, GeForce GTX 950, GeForce GTX 960, GeForce GTX 970, GeForce GTX 980, GeForce GTX 980 Ti, GeForce GTX Titan X, GeForce 830M*, GeForce 840M*, GeForce 845M*, GeForce GTX 850M, GeForce GTX 860M, GeForce 930M*, GeForce 940M*, GeForce GTX 950M, GeForce GTX 960M, GeForce GTX 965M, GeForce GTX 970M, GeForce GTX 980M and GeForce GTX 980.
Professional: GRID K1, GRID K2, GRID K340, GRID K520, Tesla K10, Tesla K20, Tesla K20X, Tesla K40, Tesla K80, Quadro 410, Quadro K420, Quadro K600, Quadro K2000, Quadro K2000D, Quadro K4000, Quadro K4200, Quadro K5000, Quadro K5200, Quadro K6000, Quadro K500M, Quadro K510M, Quadro K610M, Quadro K1000M, Quadro K1100M, Quadro K2000M, Quadro K2100M, Quadro K3000M, Quadro K3100M, Quadro K4000M, Quadro K4100M, Quadro K5000M, K5100M and Quadro NVS 510.
Quadro K620, Quadro K1200, Quadro K2200, Quadro M600M, Quadro M1000M, Quadro M2000M, Quadro M600M, Quadro M1000M, Quadro M2000M, Quadro NVS 810, Quadro M4000, Quadro M5000, Quadro M6000, Quadro M3000M, Quadro M4000M, Quadro M5000M, Tesla M6 and M60.
Quadro P400, Quadro P600, Quadro P1000, Quadro P2000, Quadro P4000, Quadro P5000, Quadro P6000, Quadro GP100, Tesla P4, Tesla P40, Tesla P100.
Maxwell architecture: first-generation Maxwell (GM107, not GM108) supports HiP444 profile encoding (YUV444, Predictive Coding, I/P frames), 16x real-time H.264 1080p@480fps (1x = 1080p@30 fps); second-generation Maxwell (GM200, GM204, GM206, not GM208) supports HEVC/H.265 and 4K UHD 2160p@60fps H.264 (2160p60).
Pascal architecture: supports HEVC/H.265 Main10 10-bit encoding, 4K UHD HEVC/H.265, and 8K HEVC/H.265.
Kepler architecture (GK104, GK106, GK107, GK110, GK110B, GK210, not GK208): supports HD 1080p encoding, H.264/AVC high-profile (YUV420, I/P/B frames, CAVLC/CABAC), 8x real-time H.264 1080p@240fps (1x = 1080p@30 fps), H.264/SVC (temporal), and Display Encode Mode (DEM).
NVIDIA graphics cards that do not support hardware acceleration
Expand list
GM108 (Maxwell):
- NVIDIA GeForce 830M
- NVIDIA GeForce 840M
- NVIDIA GeForce 845M (NVENC depends on hardware revision — GM107 vs GM108)
- NVIDIA GeForce 920M (GK208B)
- NVIDIA GeForce 920MX
- NVIDIA GeForce 930M
- NVIDIA GeForce 930MX
- NVIDIA GeForce 940M
- NVIDIA GeForce 940MX
- NVIDIA GeForce 945M
- NVIDIA GeForce MX110
- NVIDIA GeForce MX130
- NVIDIA Quadro K620M
- NVIDIA Quadro M500M
- NVIDIA Quadro M520 Mobile
GP108 (Pascal):
- NVIDIA GeForce GT 1030
- NVIDIA GeForce MX150
- NVIDIA GeForce MX230
- NVIDIA GeForce MX250
- NVIDIA Quadro P500 Mobile
GP108B (Pascal):
- NVIDIA GeForce MX250
Other older generations:
- NVIDIA GeForce GT 705 (Fermi)
- NVIDIA GeForce GT 630 (there is GF108 and there is GK208)
- NVIDIA GeForce GT 730 (NVENC depends on hardware revision — Fermi GF108 vs Kepler GK208)
FAQ
Video tutorial:
Instalab 360 supports GoPro Black 7-13 cameras, except GoPro Black 9.
GoPro Black 9 is not supported.
We recommend using GoPro Black 10, 11, 12, or 13. Before an event, always make a test recording and check that the program sees the camera, starts recording, and receives the video file.
Yes. A Wi-Fi adapter is required for normal operation.
It gives the computer a second Wi-Fi connection. One Wi-Fi connection is used for the GoPro camera, and the other one is used for internet access.
Usually one external Wi-Fi adapter is enough. The GoPro connects to it, while the laptop built-in Wi-Fi connects to the internet.
It is better to use a Wi-Fi adapter that supports both 2.4 GHz and 5 GHz. A model with an external antenna is also preferable because it usually gives a stronger and more stable signal to the camera.
Most often, the camera must first be activated through the GoPro Quik app on your phone.
Steps:
- Turn on the GoPro.
- Open GoPro Quik on your phone.
- Connect to the camera.
- Tap Preview so the camera image appears on the phone.
- Disconnect from the camera on the phone.
- On the computer, connect to the GoPro Wi-Fi network.
- Open Instalab 360 and check the connection.
If the GoPro network does not appear, reset the camera connections, remove the old GoPro Wi-Fi network on the computer, and connect again.
A Wi-Fi connection to the camera does not always mean that the program has received a response from it.
Check:
- The camera is turned on.
- The camera is in video mode.
- The computer is connected specifically to the GoPro Wi-Fi network.
- The correct camera name is entered in the program settings.
- The camera was previously connected through GoPro Quik.
- The camera has not gone into sleep mode.
- There is free space on the memory card.
- The camera has enough charge.
If the problem continues, remove the GoPro Wi-Fi network on the computer and connect to it again.
This is normal. GoPro Wi-Fi is used only for communication with the camera. Internet access does not work through this network.
To work with the camera and the internet at the same time, you need a Wi-Fi adapter. The camera connects to the external Wi-Fi adapter, and the laptop built-in Wi-Fi connects to the internet.
You can also use these options for internet access:
- Internet sharing from a phone.
- A USB modem.
- Wired internet.
Check the following in order:
- Connect the camera through GoPro Quik and tap Preview.
- Remove the old GoPro Wi-Fi network on the computer.
- Connect to GoPro Wi-Fi again.
- Check the camera power cable.
- Check the Powerbank.
- Try another USB-C cable.
- Make sure the camera is not overheating.
- Disable automatic connection to other Wi-Fi networks on the computer.
- Try switching the camera Wi-Fi from 2.4 GHz to 5 GHz or the other way around.
At venues with many Wi-Fi networks, the camera connection may be less stable.
Yes, the camera can be powered from a Powerbank. For stable operation, use a good Powerbank and a good USB-C cable.
Check:
- The Powerbank provides enough power.
- The cable supports stable power delivery.
- The camera is not overheating.
- The USB-C connector fits tightly in the camera.
- The Powerbank does not turn off by itself because of low load.
If the camera says there is not enough power, replace the cable or the Powerbank.
This usually means that the camera received the command to start recording, but the connection between the program and the camera was interrupted afterward.
Check:
- The Wi-Fi connection to GoPro.
- Camera power.
- The USB-C cable.
- The Powerbank.
- The camera charge level.
- Whether the computer switched to another Wi-Fi network.
- Whether the camera went into sleep mode.
After checking, restart the program and make a test recording.
Recommended basic settings:
- Video mode.
- 1080 resolution.
- 120 fps for slow motion.
- Hypersmooth stabilization disabled.
- Enough free space on the memory card.
- The camera is mounted in the required orientation: horizontal or vertical.
If the camera shows 100 fps instead of 120 fps, check the regional settings. For 120 fps, you usually need to switch the frequency from 50 Hz to 60 Hz.
Most likely, the camera is recording in the wrong mode.
Check that GoPro is set to video mode, 1080 resolution, and 120 fps. If the camera records at 60 fps or in another mode, slow motion may not work correctly.
This is normal. The camera records at a high frame rate so the program can create smooth slow motion. The final file may be saved at 30 fps.
The start of recording depends on the communication delay between the computer and the camera. Sometimes the command reaches the camera faster, sometimes slower.
What you can do:
- Start the platform from the same position each time.
- Increase the delay before recording.
- Check Wi-Fi connection stability.
- Make sure the camera does not disconnect during recording.
A small shift in the slow motion moment is normal.
Yes, it is better to disable Hypersmooth stabilization.
When the camera rotates, stabilization can distort the image, shift the frame, or make the video look like it is drifting.
If the video shakes too much without stabilization, check:
- The camera mount.
- The platform mechanics.
- The surface where the platform stands.
- Whether guests are jumping during recording.
- The source file in the
rawfolder.
First, check the source video in the raw folder.
If the shaking is visible in the source file, the program is not the cause. Possible reasons:
- The platform is standing on an uneven surface.
- The camera is not fixed firmly.
- Guests are jumping on the platform.
- The camera mount or stand has play.
- The platform has become loose.
- GoPro stabilization is enabled.
If the source file looks fine and shaking appears only after processing, check the video format, overlays, intro files, and codecs.
Usually these folders are used:
- Source videos from the camera: the
rawfolder. - Videos for reprocessing:
C:/instalab360/input. - Final videos: the output folder selected in the program settings.
To quickly find a final video, right-click the preview in the program and open the file location.
Yes.
Put the source file into this folder:
C:/instalab360/input
After that, the program will process the video again.
This is useful if you need to replace the frame, logo, music, intro, or effect.
Check:
- Whether the source file exists in the
rawfolder. - Whether the file is still on the GoPro memory card.
- The size of the file in the
failedfolder. - Whether there is free space on the computer disk.
- Whether there is free space on the memory card.
- Whether the correct recording format is selected.
- Whether there is an error in the overlay, music, or intro file.
Do not delete files from the GoPro card until you are sure that all videos have been processed and uploaded successfully.
Possible reasons:
- Unsupported video format.
- Error in the music file.
- Error in the overlay.
- Error in the intro file.
- Codecs are not installed.
- The video is too long.
- The laptop is too weak.
- Not enough disk space.
- Hardware acceleration is not working.
Quick check: temporarily disable music, intro, overlay, and effects, then process one test video.
If previews are not displayed in the program, restart the program as administrator.
If previews are visible but the final video does not open when you click the preview, install K-Lite Codec Pack.
Codecs are needed by Windows to correctly play some video files.
Processing speed depends on:
- The video length.
- The number of slow motion segments.
- The final video quality.
- Processor power.
- The graphics card.
- Hardware acceleration availability.
For fast work, we recommend a laptop with a dedicated NVIDIA GeForce graphics card that supports hardware encoding.
It is best to use a laptop with an NVIDIA GeForce graphics card and NVENC support.
A good reference point for comfortable work is GTX 1650 or better.
On weak laptops and integrated graphics, the program may work more slowly.
This error usually means that the program did not receive a valid server response during authorization.
What to do:
- Check the internet connection.
- Disconnect from GoPro Wi-Fi.
- Connect the computer to normal internet.
- Try sharing internet from a phone.
- Run the program as administrator.
- Check whether the Instalab 360 website opens in a browser.
If the website does not open, the problem is related to the internet connection or network blocking.
Basic setup principle:
- Left folder: the folder on the server.
- Right folder: the folder with final videos on the computer.
- On the server, select the folder for the correct gallery.
- On the computer, select the Instalab 360 output folder.
- Do not select the server root.
- Do not select the
thumbnailsfolder. - Run Analyze.
- Run Sync.
- Enable auto sync for automatic upload.
Check:
- Whether the correct gallery is open.
- Whether the correct server folder is selected.
- Whether the correct folder with final videos is selected on the computer.
- Whether videos are being uploaded to an old gallery.
- Whether GoodSync synchronization is running.
- Whether internet access is available.
- Whether the
thumbnailsfolder was accidentally selected.
If old videos appear in a new gallery, GoodSync is using an old video folder on the computer.
Delete unnecessary galleries through the personal account.
After a gallery is deleted, the files are removed from the server and space is freed.
Do not delete files through GoodSync unless you are sure about the synchronization direction. With incorrect settings, you can accidentally delete needed files.
Most likely, the cloud storage is full.
What to do:
- Open the personal account.
- Delete old unnecessary galleries.
- Wait until the space is freed.
- Run synchronization again.
The QR code leads to the event gallery where all uploaded videos are displayed.
If you need to send one specific video to a guest, find the file on the computer and send it directly by messenger or email.
To find the file faster, right-click the video preview in the program. The file folder will open.
The gallery may not have a separate download all button.
All final videos are already saved on the computer in the output folder. To send all videos to a client, you can archive that folder and send the archive.
The logo is added through an overlay.
Steps:
- Create a PNG file with a transparent background.
- Place the logo where you need it.
- Prepare the file for the required video format.
- Select this file in the Instalab 360 settings as the overlay.
Recommended sizes:
- Horizontal video: 1920x1080.
- Vertical video: 1080x1920.
- Square video: a square file matching the selected resolution.
The most common reason is a format mismatch.
Check:
- The correct format is selected in the program: horizontal, vertical, or square.
- The overlay is prepared for the same format.
- The overlay size matches the video size.
- The PNG file has a transparent background.
- The file name does not contain extra dots, Cyrillic letters, or special characters.
- The file is not damaged.
If square format is selected, the frame must also be square.
In the program settings, select the intro file and enable the corresponding checkbox.
If the checkbox is disabled, the intro will not be added to the video.
The intro is added at the beginning of the video. To add an ending screen, use a separate editing template or prepare the video manually.
Part of the intro duration may be used for the transition.
If you need the intro to stay visible longer, make it slightly longer or change the transition duration in the settings.
Effects are added through the Effects folder.
Steps:
- Copy the needed effects into the
Effectsfolder inside Instalab 360. - Open the program.
- Select the required effect in the settings.
- Make a test processing run.
To disable an effect, remove the effect checkbox in the settings.
Possible reasons:
- Unsupported audio format.
- Damaged file.
- File name is too long or too complex.
- The file name contains Cyrillic letters, extra dots, or special characters.
What to do:
- Rename the file using a simple Latin name.
- Try another music file.
- Temporarily disable music and process a test video.
- If processing works without music, the audio file is the problem.
Steps:
- Physically rotate the GoPro vertically.
- Select vertical format in the program.
- Use a vertical camera mount.
- Prepare intros, frames, and overlays in vertical format.
- Make a test recording.
The side to which the camera is rotated can matter. If vertical video is not recorded or appears incorrectly, rotate the camera to the other side and test again.
If the program says the video aspect is incorrect, the camera, program, or graphic materials are configured for different formats.
Check the camera regional settings.
If 50 Hz/PAL is selected, the camera may show 100 fps instead of 120 fps.
For 120 fps, switch the frequency to 60 Hz/NTSC.
GoPro Quik may be unavailable in some App Store regions.
Solution:
- Create or use an Apple ID with a region where the app is available.
- Sign in to the App Store with that Apple ID.
- Download GoPro Quik.
- After installation, you can return to your main Apple ID.
Instalab 360 automatically detects and controls only platforms made by Instalab.
If you have a platform from another manufacturer, this is normal: the program may not see it. In this case, start and stop the platform with its remote control, and you can ignore the platform connection error in the program.
If you have an Instalab platform, check:
- Platform power.
- USB cable.
- Another USB port.
- Platform driver.
- Platform ID in the program settings.
- Running the program as administrator.
- Restarting the laptop.
If the Instalab platform appears in Device Manager but is not visible in the program, reinstall the driver and check the platform ID.
Check:
- Platform power.
- The USB cable between the platform and laptop.
- Whether the program sees the platform.
- Whether the driver is installed.
- Whether the
Spin and Recordbutton is active. - Whether the USB-RS485 converter is damaged.
If the problem appeared after a power surge or static discharge, the USB-RS485 converter may need to be replaced.
If you have a platform from another manufacturer, start it with the remote control. The program will not be able to start or stop that platform automatically.
Possible reasons:
- Camera connection was lost.
- USB connection to the platform was lost.
- The program froze.
- USB cable problem.
- USB-RS485 converter problem.
During an event, you can turn off platform power. After that, check the camera connection, USB cable, driver, and platform connection.
If you have a platform from another manufacturer, the program does not control its start and stop. Use the platform remote control.
The program will not detect a platform from another manufacturer and will not be able to start or stop it automatically.
Instalab 360 can work with any platform as software for recording, processing, and uploading video. However, automatic start and stop are supported only for platforms made by Instalab.
If you have a platform from another manufacturer, use the remote control:
- Start recording in Instalab 360.
- Start the platform with the remote control.
- Stop the platform with the remote control.
- Then the program will process the video as usual.
Mini checklist:
- GoPro turns on and records video.
- GoPro connects through GoPro Quik.
- The computer connects to GoPro Wi-Fi through the Wi-Fi adapter.
- Instalab 360 sees the camera.
- There is separate internet access for video upload.
- The Wi-Fi adapter works stably.
- The Powerbank is charged.
- The camera USB-C cable is working.
- There is enough space on the GoPro memory card.
- There is enough space on the laptop disk.
- If you use an Instalab platform, the program sees and controls it.
- If you use another platform, check start and stop from the remote control.
- GoodSync is configured for the correct gallery.
- A test video is processed.
- A test video is uploaded to the site.
- The QR code opens the correct gallery.
Do not delete files from the GoPro card until the event is finished and all final videos have been checked.
No problem. All videos are saved locally on the computer.
If you cannot upload videos to the site gallery during an event, keep recording. Videos can be uploaded later when stable internet is available.
What to do:
- Check that final videos appear on the computer.
- If the internet is unstable, temporarily disable auto sync.
- Continue recording the event.
- After the event, connect to stable internet.
- Upload the final videos to the gallery.
- Check that the QR code opens the correct gallery.
A temporary internet problem does not stop you from recording. The main thing is that videos are saved on the computer.
Yes, Instalab 360 can work without constant internet access.
However, internet is required when starting the program. If you plan to work at a venue without internet, start the program beforehand in a place where internet is available, and do not turn off the computer until the event is over.
Internet is also needed to upload final videos to the cloud gallery. If there is no stable internet at the venue, it is fine: all videos are saved locally on the computer. You can upload them to the gallery later when normal internet is available.
The important thing is that guests keep the gallery link or QR code. After videos are uploaded to that gallery, they will be able to open the link and download their videos.
By default, each user gets 3 GB of cloud storage.
Before each new event, it is better to delete the old gallery and create a new one. This frees cloud storage space, and new videos will upload without errors.
If a large event needs more space, the cloud storage size can be increased for a small additional fee.
The number of files is not limited.
The only limit is the total cloud storage size. By default, each user has 3 GB.
To delete one video:
- Open Instalab 360.
- Move the mouse over the preview of the needed video.
- A cross will appear in the upper-right corner of the preview.
- Click the cross.
- The video will disappear from the program.
- Then open GoodSync.
- Run Analyze.
- Run Sync.
After synchronization, the video will be removed from the cloud gallery.
Need help?
If you have questions about installation or starting the program, write to the Telegram group.